Instructions
INDEX
- Functional overview
- Basic operation
- The first steps
- Frequently asked questions
- Feedback
1. FUNKTIONAL OVERVIEW
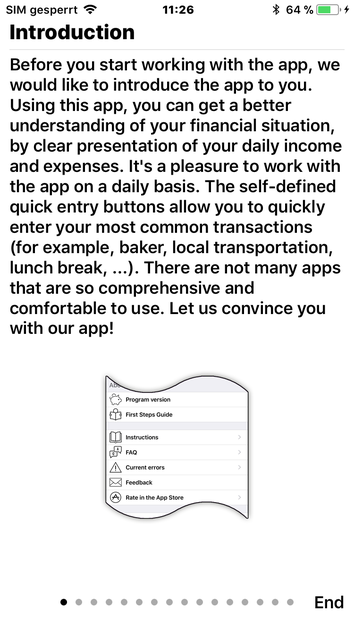
You would like to have a better overview of your finances, but you don’t want to invest a lot of money or time to do it? Maybe you have a financial goal or would like to fulfil a dream you’ve had for a long time? In this case, this app is the solution to your problems. The My Budget Pro Edition-App is illustrating your financial situation in a simple and easy graspable manner. The income and expenses are itemised into statistics, remaining easy to understand and to handle, not only by professionals, but for laymen as well. If you summarize your income and expenses in so-called criteria of accounting, you can see how much money you’ve spent for a particular category, for example groceries or transportation. This way, saving money can even be fun!
If you open the app, you can see your current account balance. Your fixed expenses (so-called repeated entries), for example your rent or your insurances, as well as your frequently changing daily expenses (the salad in the lunch break or your newly bought shirt), are taken into account as well. Depending on whether you’ve received your salary or if it’s the end of the month, the app is giving you accurate information about your remaining money and your buying pattern of the ongoing month.
On the overview page you can see multiple months, arranged and itemized in the same schema. Therefore, you can distinguish trends at an early stage and plan your budget months beforehand. Of course you can also select only a single month and view your entries.
All income, expenses and account activity are listed on the page for entries. At the same time you can see your individual entries and how your account balance has changed.
The statistic illustrates for you on the basis of your entry criteria (category, payment methods, persons or groups) for which things you’ve spend your money.
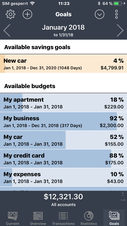
Goals tab displays budgets and savings goals. Here you can see an overview of the money available for each defined budget (i.e. food, fuel, sports), and this way you control your buying behavior. You have a smart way to see the saved money with the display of savings goals. (i.e. new car, vacation) You can keep track of the development by changing the reference period, and quickly realize when your goal is reached.
As mentioned before, the app differs between regular and one-time entries. The regular entries don’t have to be entered anew each time. Through the indication of the details of the repetition (start date, repetition interval, finish date) the app takes over the work for you. Every entry can be specified with the entry criteria (category, method of payment, person or group). Thus, not only the statistics can be shown, but also the automatic payments can’t be forgotten, which helps you with a constant survey of your outgoings.
To speed up the entry submission, there are so-called quick enter keys available, which of course can be personalised. This option is not only visually appealing designed, but also especially helpful for frequent purchases, which are not regularly repeated, but the amount and the category stays the same (for example a ticket or a donut). With this option there is no excuse anymore to not enter your just-bought donut, which leads to an enhancement of your statistic.
Another feature of our app is the possibility of having an optional account statement made or to convert the data into different formats (CSV, HTML, PDF, Excel). Additional there are different illustration facilities to visualise the data on each page. With the build-in pressure feature you can directly print all lists and graphics from the program. For this you only need an AirPrint-compatible printer. You can find more information on this topic on the apple homepage.
There is also the possibility to import your real bank statement, you can find further information in the chapter import files. If a bank or app does not support the import, we would be glad if we would receive an example file to get the possibility to add further banks to our already existing list of supported banks and apps. We also offer CSV and Excel templates for data migration by manually managing your data in order to subsequently import them. A more detailed description can be found in the chapter migrate data.
In addition, you can save or restore the data on your device in iCloud. If you occupy various devices with an apple account, you can keep them completely synchronised by using the manual iCloud function. Please remember to regularly save your valuable data, so that it does not get lost. All savings are stored encoded on your device or in the iCloud, which ensures that an unauthorised person does not have access to your data. You can additionally save your data on your PC/Mac with the iTunes-Filesharing-Function.
There is no possibility yet to keep several devices synchronised. For the moment, we can only copy all the data with the help of iCloud on different devices. Also, this app is not an online banking or accounting software. There is no connection to your bank, so that the account movements could be automatically imported.
The goal of this app is a good overview of your financial situation while being offline and to maybe help you get your situation under control.
1. Basic operation
In the upper navigation bar exists 4 important functions to control the app

These 4 icons (settings-quick entry key-selection-menu) have the following meaning
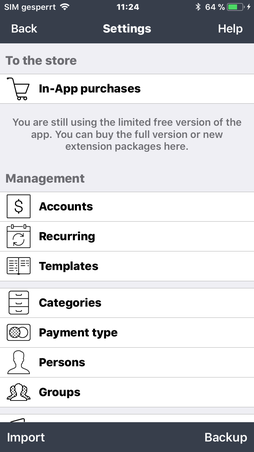
In the adjustments (gear-wheel) you can configure the app, change a lot of options, adjust language and currency, activate/deactivate your password, make backups and export or import data. Additional you receive information about the app and the team behind OneTwoApps.
With the aid of the quick enter keys (plus) you have the opportunity to make an entry or execute a command even faster. Thus your entries are going to be captured extremely fast and you have more time for the important things in life.
After you have clicked on a symbol (booking), you can either alter the amount or directly accept the booking. You will also have the possibility to edit the booking before saving it.
You can configure the keys based on your requirements in the settings. For this purpose you will find a multitude of features or you can define individual bookings. You can choose from 365 symbols for a more emphasized display of your key. Once you use it you will see how fast data entry is actually possible.
With selection (arrow key downward) you can change the selected account, the view and the sortation as well as change the display of the data. Also you can determine, if the transfer of the last month or of your future transmissions should be taken in account. With this (and a few other options within this function) you are able to arrange the app completely to your requirements.
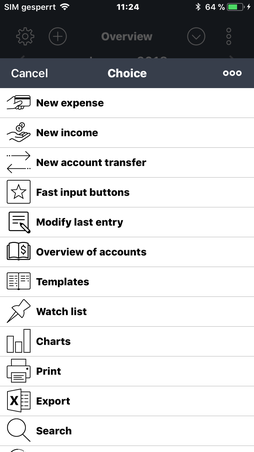
The menu contain a variety of useful commands. You have the opportunity to generate an entry or to change the last one. With the search function, locate and maybe change data, will be a piece of cake. Furthermore you can find tools here, which will provide you with an overview of your financial situation and evaluate it. Here you can print, visualise and export your data.
In the lower areas you will find the most important features of this app. In this area the current account balance as well as the chosen account will be displayed. If you swipe with your finger over the amount view, the display (depending on the dialogue) changes. A click on this display opens the account selection dialogue.
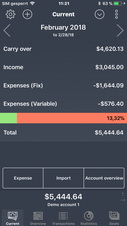
2.1 current
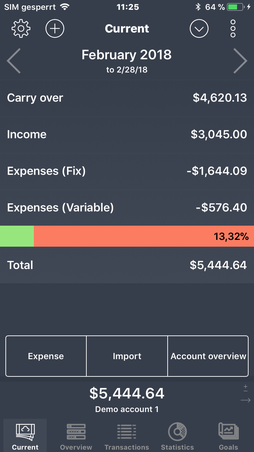
You have an overview of your financial situation on the Currenttab. The incomes, fixed expenses, current budget, daily expenses and, when necessary, the carryover that extended from the previous month for the current observation period (when the option "consider previous months" is active) are available. You can also find the functions for creating new incomes, expenses and transfers here. You can configure these three commands in the settings freely.
TIP 1: You can change the observation period by clicking on the upper date display or wiping to the right or left on this display. You can choose between the following settings: current month, current quarter, current half-year, current year.
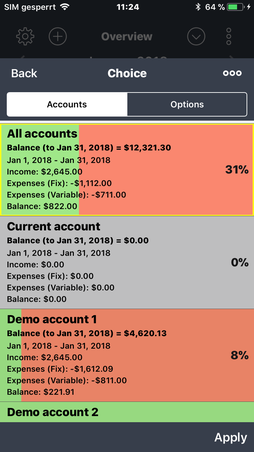
TIP 2: If you want to change the selected account, you can either click on the amount below or you click on the command “selection” (arrow downward) on the navigation bar at the top and choose the tap “accounts”.
TIP 3: Would you like to take into consideration the carryover from the previous months? Then click on the second icon (selection, down arrow) in the top right corner of the navigation bar and activate the switch "consider previous months" under options. The same applies to the future entries. This can be used to configure the complete view generally.
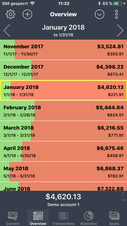
2.2 Overview
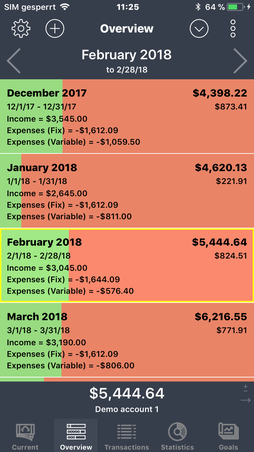
The relation between income and expenses every month is visualised on the tap overview, so that you have a long-term overview of how much money you have left in the particular month. With this you have a better survey and it’s easy to make out the shortages and trends. As easy as that you can kill off being in the red.
With selection you can establish, if you want to have a compact or a detailed illustration, depending if you want a short and precise overview of the months or if you would like to have more detailed information. With a click on one month, the relevant bank statement is displayed.
TIP 1: If you shift an entry to the left or right, you obtain more commands.
TIP 2: The amount of months can be adjusted individually in the settings (options > overview display).
Tip 3: You can change the view (Detailed & Compact) by swiping to the left or to the right on the lower amount view. You would alternatively effect this setting by using the view dialogue.
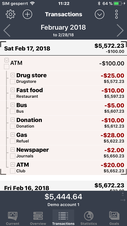
2.3 Account statement
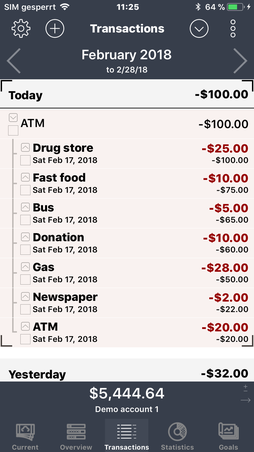
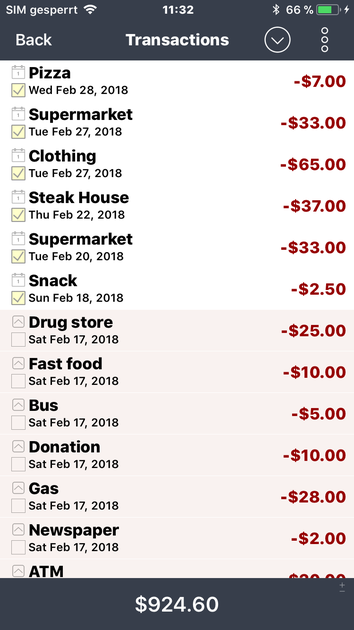
The tap entries displays all account movements for the selected period of time and the selected account. You can define the period of time in the upper date display.
Thus you can see quickly what, when and with which amount was entered in the books. On the left, beside the title, there is additional information displayed (in terms of symbols). The upper symbol shows the kind of entry, if it is a single entry, a fix entry or a cross entry. Fix entries are displayed dark, variable entries clear. The lower symbol shows if the entry has been observed (filled yellow) and/or collated, cleared or payed (selected).
To get an even better survey of the kind of entry, we have built-in a total of 11 aspects. In doing so the entries are categorised, depending on the settings.
You have the following options:
- Days – all entries are sorted chronological and displayed in groups according to the day
- Today & past & future – in this display the first entry shown is the one of today, then the entries of the past and at the end the future entries.
- Income & expenses – this display separates income from expenses
- Not equilibrated & equilibrated – In this display the not equilibrated entries are shown first, the equilibrated after
- Accounts, main categories, categories, methods of payment, persons, groups – this display groups the entries by the entry criteria.
- Date – all entries are shown chronological and without grouping
TIP 1: If you click on the upper navigation bar on “selection” (arrow downwards) and choose the tap “display”, you can diced with the option future entries included if future entries are supposed to be allocated. You can additionally decide, how the data is supposed to be displayed and processed.
TIP 2: In the settings (options > entries & entry comparison) are two options. If you only want to settle your aligned entries, activate the option “settle entry”. If you want to supress all accounting adjustment transfers in the display “all accounts”, activate the option “ignore accounting adjustment transfers”.
TIP 3: Move an item to the right to enlist the selected entry to the watch list or to mark it as “equilibrated” (settled). If you move an entry to the left, you get more useful commands.
TIP 4: To convert a single entry into a split entry later, swipe the entry to the left. Please click on the menu item "More", and select the menu item "Create a split entry". You can define the sub-entries in the following dialog. (see 3.21).
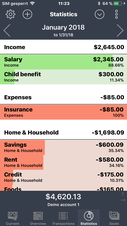
2.4 Statistic & diagram (iPad) & allocation (iPad)

The tap statistic demonstrates you the added up sums for the selected period of time, depending on the entry criteria. With the sorting (see navigation bar > selection) you can determine, which entry criteria are used for which calculation. Through a click on an inscription, all relevant entries are shown.
If you additionally would like to have an overview of the complete period of time, in the settings (options > statistics) you can activate the switch “activate overview”.
In the display section, we separate the income and expenses of each other. Depending on the setting, the expenses will further be separated in fixed expenses (e.g. rent, energy, salary, …) and variable expenses (e.g. transport ticket, coffee, pizza, …). This will offer you an even better summary of how much you money you have to spend as well as your daily requirements. You can set up this enhanced expenditure display by clicking on view with the option „separate expenses“.
If you want to compound the bookings for calculation purposes, you can do so by using the option „summarize bookings“ under view. In this case we would not consider whether a booking entry counts as revenue or as an expenditure. The amounts will be added up and displayed per booking criterion. This setting is recommended if different booking entries exist which might be allocated to the same category (e.g. „monthly energy expenses“ and „power bill refund“ which both fall under the category „electricity“) and for which you would like to determine the total amount.
TIP 1: You can change the kind of entries (income, expenses) with the option in the navigation bar, or you simply slide the lower amount to the left or right. Two small symbols on the right corner beside the amount are showing, which display is selected. For example, if you want to have a view only with the fixed expenses (Table, Chart), you can activate this entry type. All other entries will be ignored.
TIP 2: If both kinds of entries are activated, the diagram shows only the relation between income and expenses. If instead only one kind of entry is selected, you can see a detailed diagram.
2.5 Goals
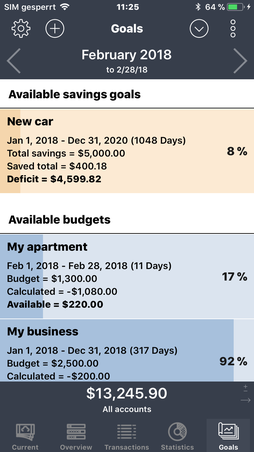
Goals tab displays all the budgets and savings goals. For a better overview, we separate the valid goals from the expired and future goals, if they are not hidden. When you select an input, all relevant entries are displayed.
If you define a budget for each group (e.g., food, vacation, car, ...), and set the available amount, you will have the perfect way to control your finances.
You can use savings goals if you want to save a certain amount for a purchase. This way, you will always know the level of your savings.
TIP 1: You receive further commands, if you move an item to the right or left.
TIP 2: You would like to deactivate a budget or change the position of the chart? If so, you have to move the item to the left and select the processing dialog (more > processing). Generally, you can also change the entries in the settings (administration > budget).
Tip 3: You can change the view (Detailed & Compact) by swiping to the left or to the
right on the lower amount view. You would alternatively effect this setting by using the view dialogue.
3. THE FIRST STEPS
To facilitate the entrance with the app, following steps should be taken in the beginning:
First, select the command adjustments. In the section administration you can edit your accounts, define templates and returning entries (fixed costs) and edit entry criteria (category, method of payment, person and groups).
In the version for free you can only place up to 16 entries every months. Furthermore, there are some functions which are not available for you. The upgrade (in-app-purchase) removes these restrictions permanently. If you’ve already bought the full version, but still can’t use the advantages, a re-establishment of the purchase should solve the problem. Of course you don’t have to pay anew (as long as you are signed in with the same apple-ID as you were when you bought the full version in the first place).
3.1 define accounts
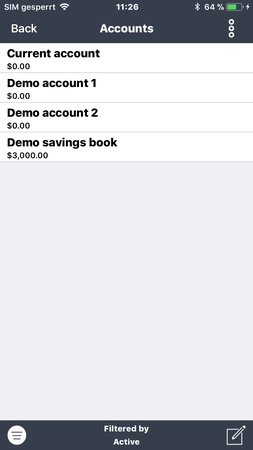
At the account management, you can unrestrained define accounts. Add a title and maybe the initial account balance. With the installation there has already been an account created, which maybe has to be changed.
If an account is eliminated, all the assigned entries are eliminated as well.
In the extended adjustments, you can define the standard value for the booking entries. Additionally, you have the possibility to activate or deactivate the account and to change the position of the list of accounts.
You can manage the list of accounts with the filter icon. (bottom left) In this list, if you move one of the inputs to the left or to the right, you will receive extra helpful commands.
3.2 Define re-emerging entries
With the category administration you have the option to change, move, eliminate and to apply main- and sub-categories. An entry can only be assigned to exactly one category.

You don’t have to enter your re-emerging entries (for example rent, electricity, insurances, wage,…) anew every time. Here you can comfortably define all fix income and expenses, by choosing the time frame and the period (once a month, once a quarter,…). The app takes over everything else. For a better overview, the re-emerging entries are applied for 2 years by default. You can change and determine the period of time as you wish.
If you would like to transfer money from one account to another, you have to define an accounting adjustment transfer. With this, an output entry is created at the source account and a revenue posting is created at the target account. These entries are linked together and are simultaneously changed or erased.
There are problems, if a single entry of a periodic entry is changed and the complete periodic entry is edited subsequently. To inform you, a small symbol appears (see entry “supermarket”). You also have the possibility to edit, end or adjust anew your entry or to change it to a single entry. For this, you only have to move an entry to the left and select the command “more”.
You can manage the list of recurring entries with the filter symbol. (bottom left) It is possible to display valid, expired or future entries.
TIP 1: It is possible to change a recurring entry easily by swiping an entry to the left and clicking the "More" command. Another menu will appear with the following commands: Adjust, Extend, Shorten, Close, Split, Delete, Copy, Turn. A short explanation will appear before the selected command is executed, so that you can cancel the process.
3.3 define templates
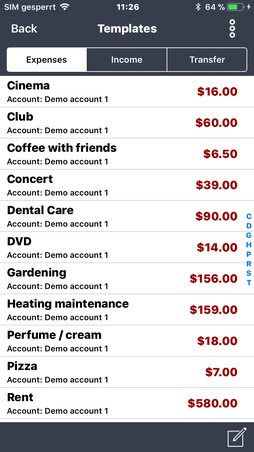
At the templates administration you can create or edit entry templates (for example “refuelling”, “cashpoint”). At the entry submission you can use these templates to preallocate domains. Also, through the menu (five horizontal lines) you have the option to directly create an entry with one of the templates.
For a faster data capture, you can alternatively use the quick enter key.
3.4 define categories
With the category administration you have the option to change, move, eliminate and to apply main- and sub-categories. An entry can only be assigned to exactly one category.
With this information, the entries can be specified more precisely, to generate detailed statistics. Apply for example the main category “apartment” and a few sub-categories which make sense
(rent, electricity, water, TV, internet). Now categorize all relevant entries with these categories. Now, with the additional information, you can assert how much money was spent on the single
categories. And you decide, which entry criteria you want to use.
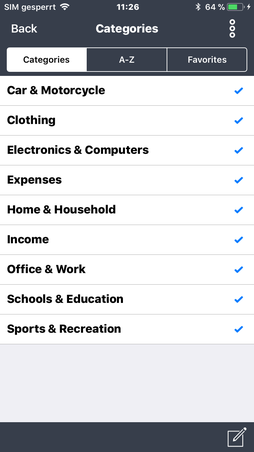
This app has some initialized categories. Every category which is used at the moment, gets a blue check mark on the list.
In the tap „categories“, all main categories are displayed. If you select one of the entries, you can see all sup-categories of the main category. Now you have the option to create new categories, or to edit or eliminate existing ones. If a category is eliminated, all entries within this category, are placed on “not assigned”. While editing, you can also move a sub-category by simply selecting a new main category.
You have two more displays available. In the tap “A-Z”, all categories (main- and sub-categories) are well-sorted illustrated. The tap “favourites” is listing all already used categories, depending on frequency.
3.5 define methods of payment, persons and groups
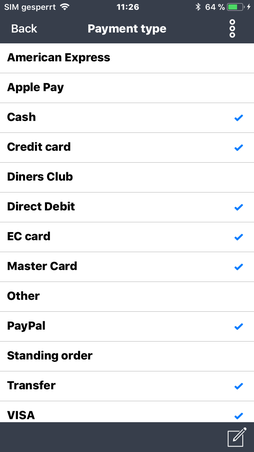
Besides the categories, you have three more entry criteria available (method of payment, persons, groups). With this you can describe your entries even more detailed and you can see interesting statistics. You can decide for yourself, how you would like to use these entry criteria.
Here you also have the initialized templates available, with which you can select fast and easy.
3.6 define budget
With the budget management you have a great tool at hand, which always gives you information about your remaining money which is available for various purchases.
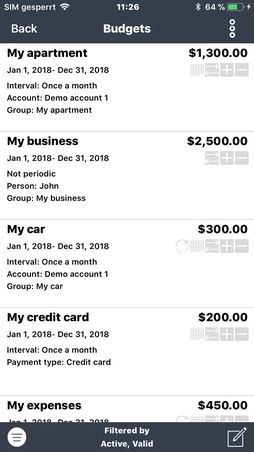
In addition you create a budget with a maximum amount and select if you want to define it as a one-time budget or a repeating budget. You decide for yourself, which calculations are supposed to be used for which entry. Moreover, you have a variety of entry criteria available.
After the definition, the entries are automatically dedicated to the budget, settled and displayed. With a repeating budget, you can automatically transfer the remaining amount of the previous time frame to the new time frame. With a repeated budget it is possible to adjust the time frame afterwards, this is especially helpful, if you have a higher budget available for this month.
You can manage your budget list with the filter symbol. (bottom left) It is possible to display active, deactive, valid, expired or future budgets.
If you want to know, for example, how much money you have left in your holiday, simply set up a budget with the entry criteria group = “holiday expenses” and category = “holiday”. Every entry which has these entry criteria, will be automatically included in the budget.
3.7 Defining savings goals
With savings goal management, you can monitor your savings on planned purchases, and keep track of when you have reached your goals.
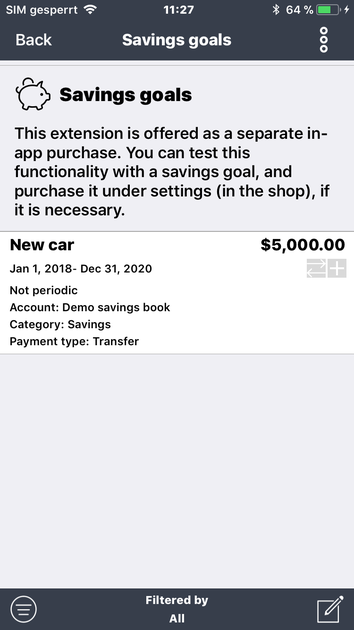
To do this, enter the total amount of savings, determine a period of time, and choose whether you want to use a one time or a recurring savings goal. You can choose the entries you want to use for calculation. There are various entry criteria available. As with the budgets, the entries are automatically assigned to the savings goal, billed and displayed.
You can manage the list of your savings goals with the filter symbol. (bottom left) It is possible to display active, deactivated, valid, expired or future savings goals.
3.8 Setting the exchange rates
You can determine all the currencies that you want to use currently for your entries in the dialog. You can change the exchange rates between the default currency and the selected currencies manually, or update them via an active Internet connection.
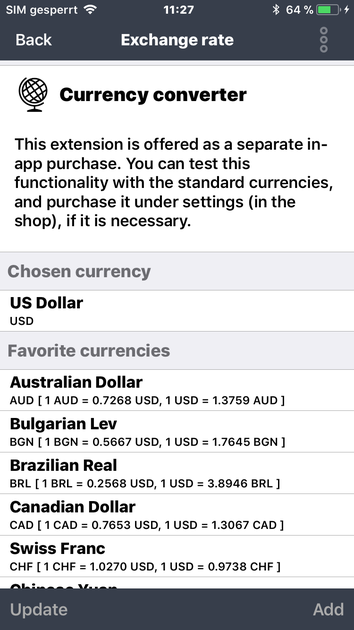
When making entry inputs, it is possible to set the currency by clicking the calculator button, which is the third button from the left, on the top. After that, a dialog opens with the selected currencies and their exchange rates.
The entry amount (including the currency) can be edited at any time.
Currently, we support only the European and the most important currencies of the world. (US Dollar, Australian Dollar, Brazilian Real, British Pound, Chinese Yuan, Hong Kong Dollar, Indian Rupee, Indonesian Rupiah, Israeli Shekel, Japanese Yen, Canadian Dollar, Malaysian Ringgit, Mexican Peso, New Zealand Dollar, Russian Ruble, Singapore Dollar, South African Rand, Thai Baht)
If a currency is not supported, you need to update the exchange rate manually.
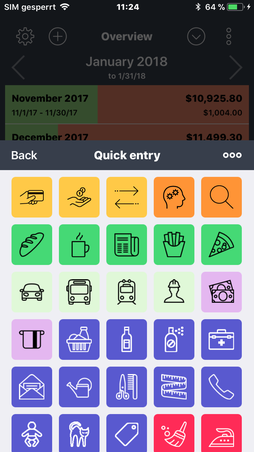
3.9 Quick entry
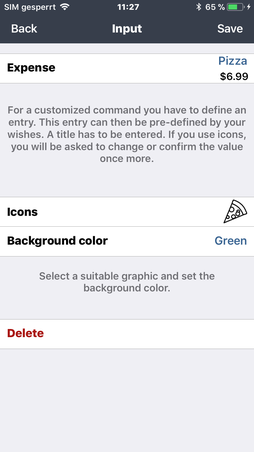
To make the booking entry even more elegant and fast, you can define hotkeys in the management sector. These hotkeys are either commands (for example search, export, backup,…) or predefined entries. For this you have 360 symbols available.
In order for you to faster choose a respective symbol, 7 new groups (Home & Traffic; Finances & Health; Going out & Food; Shopping & Clothing; Leisure & Vacation; Family & Animals; Electronics & Computer) have been introduced with an even distribution of the symbols. You can choose a group by utilizing the menu symbol on the upper navigation bar.
You can manage your individual rapid entry keys within the app by using the plus symbol on the navigation bar. After a symbol is clicked on, you can change the amount or directly accept the book entry. If you click on the left array of the display you will be able to edit the whole book entry.
TIP 1: If you want to create several entries quickly without closing the dialog, go to the settings and activate the "Fast input > Repeat input" switch.
3.10 documents
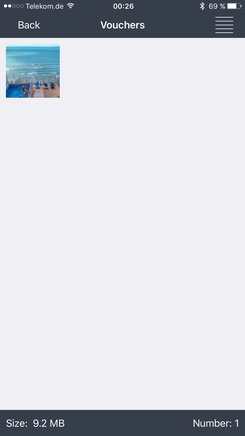
At a booking entry, you can attach a document (photo, bill, receipt,…). This function gives you an overview of all your documents and their full size. Here you can also eliminate single documents, if they are not needed anymore. Another very useful feature is the great opportunity to declare war to the uncountable bills in your wallet, without losing track.
3.11 Rule wizard
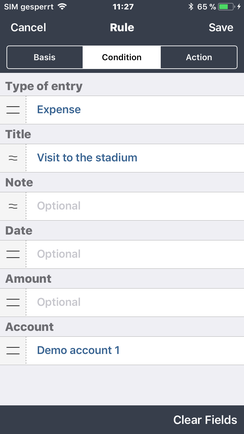
Many CSV/Excel formats do not transfer any booking criteria (category, payment method, person, group). This results in increased post-editing as well as the user having to constantly check the imported book entries as well as adding any missing information.
The rules wizard was developed for this purpose. Simply define your own rules (If-Then) and determine the conditions by which the booking criteria shall be allocated. The more frequently you enter CSV files, the more precise your rules become. The booking bar of the important book entries contains the entries, which have been automatically altered. This is a convenient feature to edit bookings or to define new rules. You can subsequently reverse the import and repeat the process with the new rules in place. You will quickly figure out the advantage this feature offers you by trying it out.
You will always have the possibility of creating a new rule from a book entry in the booking lists.
You can manage the list of rules with the filter symbol. (bottom left) It is possible to display active, deactive, valid, expired or future rules.
3.12 Language and region

With this setting, you can set the language of the app (German and English) and the default currency for all accounts. If you want to use a different currency while making entries and convert it, you can specify more currencies. Currently we only support the most important currencies in the world, including European currencies. The exchange rates can be updated either manually or online.
For the Top 10 countries, there is a faster way to change these two parameters. (language & region).
3.13 options
The app has a multitude of individual adjustments, to influence the regulation or to turn functions on/off. Take your time and familiarize yourself with the individual adjustments.
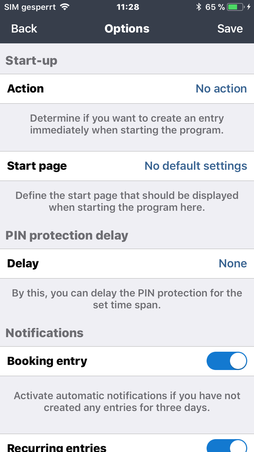
- Determine if you want to register an entry right when the program starts.
- Define the homepage, which is supposed to be displayed at the start of the program.
- Define a password-security-delay
- Activate automatic notifications, if you haven’t entered an entry for more than three days.
-
Place three commands for the toolbar ("current" tab). "expense", "income" and "transfer" commands are predefined by default.
-
Decide whether expired or future entries should be displayed on the "goals" tab.
- Choose for the tap “overview” the amount of observation months.
- Establish a validity period, so that not all previous months are taken into account.
- Define for the booking entry, which criteria from the last entry is supposed to be chosen.
- Determine if the suggestion bar should be blend in over the keyboard during a booking entry.
- You can determine in the statistic whether an overview shall be added.
- Switch on the rules assistant to conduct an automatic completion of the booking criteria during the import.
- Determine whether the dialogue for the booking entry shall be automatically closed after having saved a data set.
- Activate the offered widget in the message center and determine the view.
- Determine, if for the display “all accounts”, all accounting adjustment transfers are supposed to be ignored.
- Establish the beginning of the months for the observation period.
- Determine, if only equilibrated entries are incorporated.
- Determine, if subsequent entries in the entry list are displayed in grey.
- Establish the beginning of the week for the calendar.
- Determine the resolution of your saved documents (photos, bills, receipts,…)
- Activate the automatic backup
- Activate the offered widgets in the information centre.
- Activate the system sounds for different actions.
- Determine the maximum amount of search results.
- Define a standard e-mail address and subject heading for the export function.
- Activate the correction-assistant.
- And much more…
TIP 1: As for now, in the display „include previous months”, all months were taken into account. In the process, the balance beginnings of the accounts were included as well. It was not possible to only view one year. In the adjustments, you can add a validity period. Only entries are shown or incorporated, which lie within the specified time frame. At the date display, a small symbol is shown as identification mark. But in this mode the initial balance beginnings of the accounts are not taken into account.
3.14 password security
Secure your app from unauthorized access with a password or simply with a touch-ID. If you lose your password, you don’t have access to your data anymore! For this reason we recommend strongly to make a backup in iCloud.
TIP 1: Through a password protection delay you can arrange, that you don’t have to re-enter your password with each change of program. You can establish this feature in adjustments > options.
3.15 backup and restore
Here you can make backups or restore saved backups on your device. If you have iCloud activated on your device, you can save your data in iCloud or download your data from iCloud. Thus, data can me manually transferred between various devices.
All backups are saved encoded on your device or iCloud, to ensure that no unauthorized person gains access to the valuable data. With the iTunes-Fileshraion-Function you have local access to the data.
- Simply establish a local backup in the app and connect the device with your computer.
- Open iTunes and click in the lower left corner on adjustments and on the tap „apps“.
- In the right section (apps) appear in file clearance all cleared apps.
- After clicking on the app, you can see in documents all cleared files.
- With the buttons “add” and “save as” you can access these files. With this you gain the option to save your backups on an external device. If you add a file to the list and synchronize iTunes, the file is automatically copied to your device.
- Through the restore function within the app, you can afterwards access and import these backups.
There is also the option so send an applied backup via e-mail.
Make regularly backups, so that if you lose your data, you can restore them at any time. This app does not contain automatic synchronization with iCloud!
In the same manner you can install and copy the backups of our apps my budget or my money, if you would like to switch.
It is possible to change the format in the settings, and you do not have to enter a file name every time. In the settings, you can deactivate the unwanted prompt asking about the existence of the file, and you can store the iCloud backup locally as well.
3.16 export data
If you would like to export your entry files, the formats Excel, HTML, PDF or CSV are available to you. The result is either send via e-mail with the standard-iOS-mail-function or saved local on your device (see chapter “iTunes-filesharing-function”).
You would like to switch to another program? If so, create a CSV or Excel templet and transfer the data according to the given pattern and save it via iTunes-Filesharing on your device. Afterwards, you can import the file.
3.17 import files
If you would like to import your files, you first have to copy your files onto your device. Proceed as described in the chapter “iTunes-Filesharing-Function” and copy the files with the program iTunes. Another option would be to send a CSV-file to your own e-mail address. Then open the e-mail and click on the attachment (CSV-file) until the iOS-selection dialog appears. Afterwards you have to determine, which app gets the file. Now you can open the command “import files” in your adjustments, select the format and start the import.
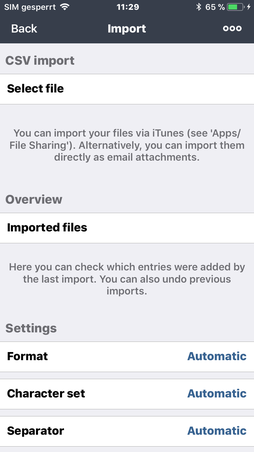
The CSV-dialog has three areas: CSV-import, overview and adjustments.
In adjustments you can select the format, the symbol set and the delimiter symbol. Not every CSV-file has a header to automatically identify the bank. If your bank provides such a file, you have to indicate this bank here. The banks use different symbol sets. Possibly you have to make the adjustment here, so that the file can be imported. Normally the delimiter symbol is selected automatically.
Now you can decide, how to handle the entries which were already imported, to avoid double entries.
Afterwards you can determine an account, where the entries should be discarded. Some banks have additional information in the CSV-file (for example account name, account number,…). Because the banks don’t provide a unitary CSF-format, only the entry files are taken over. All other information is ignored.
Every imported file leaves an entry in the overview. At every time you can retract a complete import, by moving the entry in the list to the left. The selection “more” appears with the commands view, eliminate and retract. If you choose an entry of the chart, you can see all imported entries. These entries can be edited or erased afterwards.
Normally, every imported entry is assigned as variable (daily) entry. But you can change every single entry with the menu to a fix entry at any time.
After you’ve made the adjustments, you can select a CSV-file. If the import was successful, please check if the entries are displayed correctly. If necessary, delete the delivery completely and check the adjustments.
At the moment, we support the following banks (without guarantee):
- 1822direkt [Deutschland]
- ABN Amro [Niederlande]
- Algemene Spaarbank [Niederlande]
- Alternative Bank Schweiz [Schweiz]
- Apotheker- und Ärztebank [Deutschland]
- Baden-Württembergische Bank [Deutschland]
- Badische Beamtenbank [Deutschland]
- Bank Austra [Österreich]
- Bank für Arbeit und Wirtschaft und Österreichische Postsparkasse AG (Bawag P.S.K.) [Österreich]
- BKS Bank [Österreich]
- Business Elba Österreich [Österreich]
- Comdirect Bank [Deutschland]
- DAB Bank [Deutschland]
- Degussa Bank [Deutschland]
- Deutsche Bank [Deutschland]
- Deutsche Kreditbank (DKB) [Deutschland]
- DKB Deutsche Kreditbank [Deutschland]
- Easybank AG [Österreich]
- Elba Österreich [Österreich]
- Fidor Bank [Deutschland]
- Frankfurter Volksbank [Deutschland]
- GLS Gemeinschaftsbank eG [Deutschland]
- Hamburger-Sparkasse [Deutschland]
- ING-DiBa [Deutschland]
- Kreissparkasse Köln [Deutschland]
- Kreissparkasse München-Starnberg [Deutschland]
- NordLB [Deutschland]
- Norisbank [Deutschland]
- Postbank [Deutschland]
- PSD Bank Westfalen-Lippe eG [Deutschland]
- Raiffeisenbank [Österreich]
- Santander Bank [Deutschland]
- Sparda Bank Berlin [Deutschland]
- Sparda Bank München [Deutschland]
- Sparda Bank Süd-West [Deutschland]
- Sparkasse Bremen [Deutschland]
- Sparkasse Duisburg [Deutschland]
- Sparkasse Essen [Deutschland]
- Sparkasse Forchheim [Deutschland]
- Sparkasse Frankfurt [Deutschland]
- Sparkasse Fürstenfeldbruck [Deutschland]
- Sparkasse Köln Bonn [Deutschland]
- Sparkasse Markgräflerland [Deutschland]
- Sparkasse Pforzheim [Deutschland]
- Sparkasse Rheine [Deutschland]
- Sparkasse Witten [Deutschland]
- Stadtsparkasse Augsburg [Deutschland]
- Stadtsparkasse München [Deutschland]
- Steiermärkische Sparkasse [Österreich]
- TargoBank [Deutschland]
- Taunussparkasse [Deutschland]
- Unicredit Bank Austria [Österreich]
- UniCredit HypoVereinsbank [Deutschland]
- Vereinigte-Sparkassen [Deutschland]
- Volksbank Bonn Rhein-Sieg [Deutschland]
- Volksbank Kraichgau [Deutschland]
- Volksbank Osnabrück [Deutschland]
- Volksbank RAG [Österreich]
- Volksbank Voecklabruck-Gmunden [Deutschland]
- Volkskredikbank AG [Österreich]
- VR Bank München [Deutschland]
- VR-Bank eG [Deutschland]
At the moment, we support the following banks (without guarantee):
- All Budget
- Cost
- Filki
- Finanzblick
- iXpenseIt + Einkommen
- Mein Haushaltsbuch
- Meine Ausgaben
- Meine Finanzen - Persönliche Einnahmen und Ausgaben Verwaltung
- Money Book
- MoneyControl
- MoneyCouch
- MoneyWiz
- My Budget 2 - Einnahmen und Ausgaben Verwaltung, Persönliche Finanzen, Budgetplanung, Rechnungen
- Outbank
- PocketExpense
If an import does not work, please send immediately an e-mail to the following address so that we can solve the problem: ios@onetwoapps.com
Usually, your bank provides you with CSV-files. If you practice online banking, you can provoke an export. Afterwards, open Editor and change the personal files like account number and name, without changing the formatting. Please change the files only with Editor and not with other programs like Excel or Numbers. Of course your files are treated with discretion and once more changed by us. Additional, add your bank name (or BIN), so that we know for which bank the CSV-importer will be programmed.
There is also the option to import an Excel file. The procedure is almost identical with the CSV-import, but there are not as many adjustments.
3.18 Migration
The app supports a set of different CSV formats of diverse banks and programs. Unfortunately the CSV format is not standardized which renders the worldwide support of all financial institutions impossible. We do furthermore not receive any feedback in case any CSV files have been structurally altered. For this purpose we have created a standard format with which you can migrate your files. For this purpose, you simply create a template (CSV or Excel) and manually transfer the data in the specified format.
The created CSV template looks as follows:
"DATE" ,"TITLE" ,"COMMENT", "PAYMENT TYPE", "MAIN CATEGORY", "SUB-CATEGORY" ,"PERSON", "GROUP", "ACCOUNT" ,"DOCUMENTATION", "TAGGED", "CLEARED", "AMOUNT"
"2017-09-15","Gehalt","","Überweisung","Einnahmen","Gehalt","Christian","","Demo-Account 1","Nein","Nein","Nein","2.345,00"
"2017-09-15","Pizza","","","Wohnung & Haushalt","Nahrungsmittel","","","Demo-Account 1","Nein","Nein","Nein","-7,00"
The first line, the so-called header, describes how the following lines will be structured. After that follow the booking entries line by line. Every single value of a line contains an inverted comma at the end. The values are consecutively separated by a comma. All mandatory fields must be mentioned. All other fields can be left empty. Again, pay attention to the quotation marks („“). The format must be strictly adhered by. Otherwise the file cannot be implemented.
A line (represents one booking entry) is structured as follows:
DATE - Date [Example: 28.09.2017] (Required field)
TITLE - Title (Required field)
COMMENT - Note
PAYMENT TYPE - Payment type (booking criterion)
MAIN CATEGORY - Main category (booking criterion)
SUB-CATEGORY - Sub categories (booking criterion)
PERSON - Person (booking criterion;)
GROUP - Group (booking criterion)
ACCOUNT - Account (booking criterion)
DOCUMENTATION - Documentation [Ja/Nein; Yes/No]
TAGGED - Tagged [Ja/Nein; Yes/No]
CLEARED - Cleared [Ja/Nein; Yes/No]
AMOUNT - Amount [Example: 300,00 oder -200,00] (Required field)
There are even shorter formats, which you can use as well:
"DATE","TITLE","AMOUNT"
"DATE","TITLE","MAIN CATEGORY","SUB-CATEGORY","ACCOUNT","AMOUNT"
After you have created the CSV file you proceed as follows to transfer and import the file to your device:
- Open the iTunes application and click on the tab „apps“ under settings.
- In the right range (apps), under file-sharing, all shared apps appear. Starting with iTunes version 12.7 you will find the file share feature directly under settings.
- After you have clicked on this app, you will see all the shared files (CSV files, backups, ...) under documents. Add your CSV file ( button „add“) or drag and drop the file here.
- It is even easier if you want to import the CSV file from an e-mail. Click on this file until a selection dialog appears. Now select the "My Budget Book" or "My Money" app to start the import.
- Since the banks do not provide a unique CSV format, you may have to set the character set of the CSV file and the separator used. Some banks deliver your CSV files without a description (header) in the first line. In order to import this file with the app, the format may have to be set. Standardly, all parameters are automatically determined. If the import fails, you must change these settings.
- Each file that is imported leaves an entry in the overview. You can undo a complete import at any time by moving an entry to the left and clicking „More". A menu with the commands „View“, „Delete“ and „Undo“ is displayed.
- If you select an entry in the table, you will see all the imported entries. These entries can be edited or deleted later.
- After you have made the settings, you can now select a CSV file (without guarantee). If the import was successful, please check if the entries are displayed correctly. If necessary, delete the complete supply and check the settings.
You also have the option to import an Excel file. We offer within our app a template for this format as well. The procedure is nearly identical to the procedure regarding the CSV import.
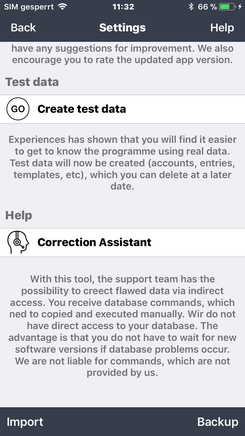
3.19 providing test data
Experience has shown, that you can get to know the program better, if the data (account, entry, templets,…) is already existing. In the adjustments you can reset the program at any time, so that you can work with an empty data set.
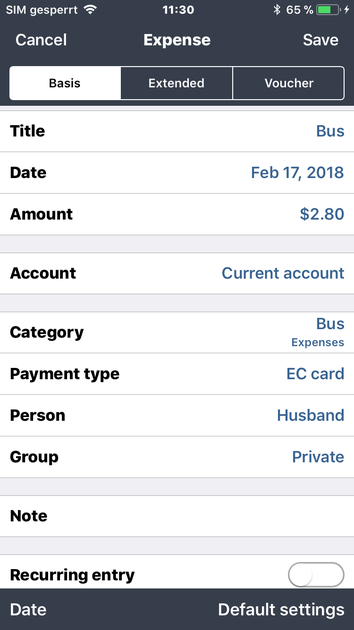
3.20 recording of entries
After you have configurated the app, you can record income and expenses, by using the quick enter key or by opening the menu and execute the according commands. With the quick enter symbols you have a powerful tool in your hands to set up a complete entry with only 3 clicks. There is no app with a faster data collection.
If you wish a manual input, you have to submit the date of the entry, the amount and an account. To classify the entry, there are various criteria available. To calculate a meaningful statistic, you should make use of it. The data collection works faster, if you use templets. For this, you click on the command “pre booking”. Here you have the option to copy the last entry or select a templet.
If you want to use a different currency, click on the calculator which is the third icon from the left, on the top, and select the suitable currency from the list. You can also update the current exchange rates with an active internet connection. After that, the entered amount is converted into the standard currency.
In addition you have the opportunity to create repeating entries, by selecting an expiry date and the period. For a meaningful overview, the finish date of the repetition will automatically be set for 2 years. This date can be individually adjusted when entering the information.
It is possible to tag a single entry as a split entry. It means the current entry (for example ATM, 100 EUR) will be split into partial entries with different entry criteria (for example 30 EUR hair salon, 50 EUR food, 20 EUR sport). This happens in the following dialog. However, the total sum of the partial postings must match the amount of the split entry. Then all evaluations will consider just the entry criteria of the partial entries and ignore the split entry (see 3.21).
Another special feature of this program are the document entries. These are entries, which are shown but not incorporated. You can use the entries to capture possible income or expenses.
You have the option to equalize the entry (the entry will be marked as “payed”). This function makes sense, if only equalized entries are supposed to be incorporated. You can choose these option in adjustments. All not equalized entries are marked in the entry list with a grey background and are not incorporated. You can mark the entry quickly as incorporated by moving it to the right and clicking on “balancing”.
You can also observe an entry and inscribe it in the watch list. With the help of search or extended search you can easily open an individual watch list.
If you would like that your entry is sending a reminder, you have the option to establish up to 2 reminders.
You will quickly realize that the booking entry dialogue will constantly be opened and closed when you have to repeatedly enter book entries. This will probably seem like quite a nuisance if the entries are (nearly) identical bookings. For this purpose you will find an option in the settings, that will ask you how the next step should look like. Here you will find the following options available
- Repeat booking entry
- Create new booking
- End booking entry
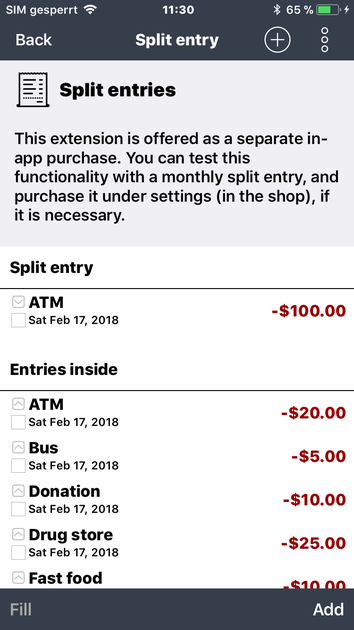
3.21 split entries
This extension supports split entries. Maybe you know the problem. You withdraw money from the ATM, and make different spendings. You buy new shoes, you get a present for your wife, and you go to a soccer game with your son. There is only one expense on the bank statement. But in your budget book you want to list all the expenses in detail, and you do not want to lose the “ATM” information. For this purpose split entries are introduced, for you to prevent your statistics from being falsified.
You can easily create split entries by going to the entry list and swiping a single entry to the left. After that, a menu will appear. Please click on the menu item "More" and select the menu item "Create split entry". It is also possible to set the "split entry" switch directly when you are making an entry input. You can define the sub-entries in the following dialog. For the same purpose, there are also fast input buttons. The open amount must be balanced before you exit this dialog (= 0.00 EUR). Only the sub-entries will be taken into account in the statistics. The actual split entry will be no longer relevant. It will be only used for the display in the entry list. You can make the same thing for the split entry. You can delete it or convert it into single entries.
3.22 Templates
A further possibility to enter transactions more quickly is to use templates. By entering a transaction, you can access the template list to initialize field values. The templates can be managed in the Settings tab or defined directly at the transaction entry by activating the "Template" button. In the entry list, you can define templates in a more elegant way by moving an entry to the left and first selecting "More" and then "Template" tab.
3.23 Watch list
All transactions you want to monitor can be added to the Watch List. You can enable this option directly at the transaction entry or in the entry list by moving an entry to the right and selecting the "Watch" tab.
3.24 Search, search & replace, extended search
In addition to the comfortable data entry, we offer you another very good and complex tool to search for files, manipulate data and
list data in accordance with specifically defined rules.
By using the menu item Search, you have another powerful feature available to find booking entries from the entire database. The search dialogue leaves nothing to be desired. By specifying operators (equal, unequal, contains, does not contain, greater than, greater than or equal, smaller than, smaller than or equal, …), you can create complex search criteria.
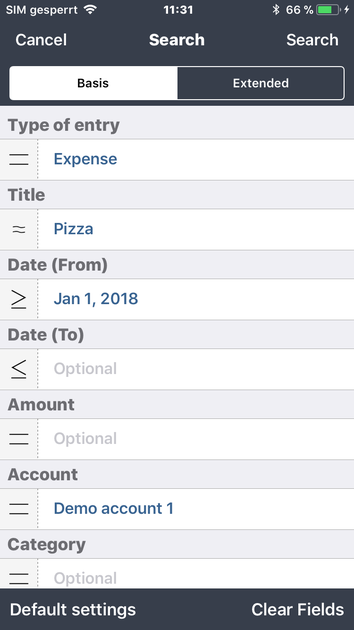
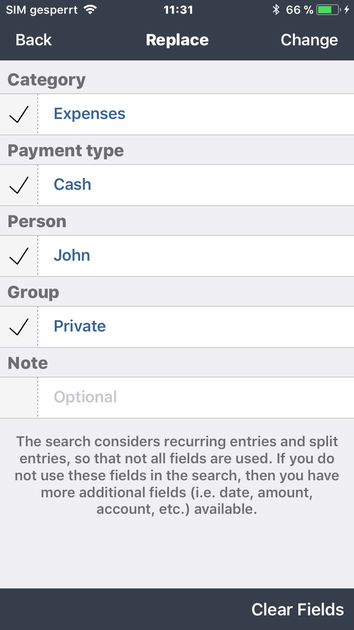
By using the Search and replace option, you can identify the erroneous transactions and make necessary corrections in a single step.
In the Advanced search tab, a number of functions are available to identify and correct erroneous entries. For example, you can display all transactions that do not correspond to certain booking criteria and make necessary changes.
3.25 Account statements
This feature offers a slew of time-related evaluations (account statements). By using the filter you can additionally specify the search. Contrary to the comfortable search you will find specific time periods at this point (e.g. the last x days, specific months, quarters, half-years, years, …) If a specific time period is missing you will be able to simply create an account statement by using the „search“ function.

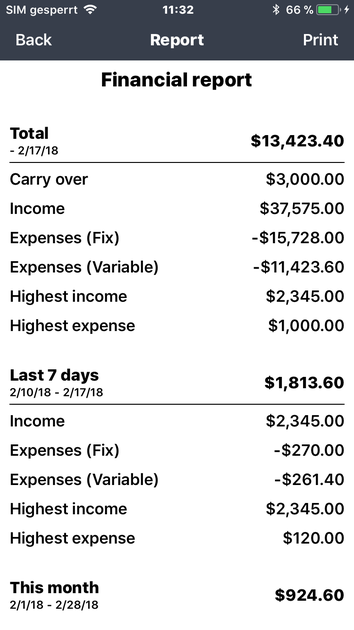
3.26 Reports
The Reports tab provides numerous options to generate evaluation reports and statistics. For example, the highest expenses or the most common categories can be displayed. In addition, you can generate a financial report that gives you an overview of all the transactions for a selected period of time (last 7 days, current month, quarter, ...). You can also generate a report where certain items of the financial statement are compared against previous periods (last 7 days, previous month, previous quarter, ...). Refine your search results by using a filter.

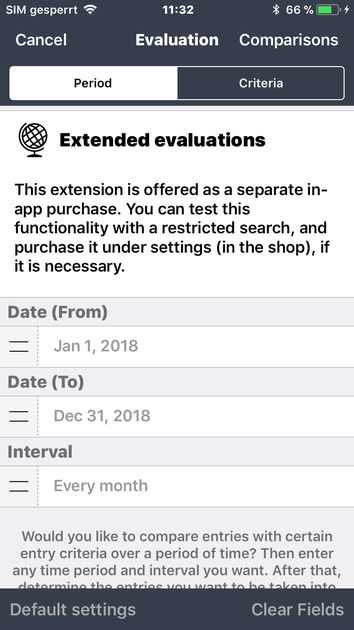
3.27 Evaluations
Here you can compare the entries with certain entry criteria over a longer period of time. (Example: Monthly comparisons of all cleared entries with the main category “Sports and Leisure” including all sub-categories in the current year) First, specify the period and the interval. Next, set the criteria to choose which entries should be taken into account. Afterwards, you will receive a detailed evaluation of how your income and expenses developed over the same period.

3.28 Correction Assistant
In the past, we often had to make changes in the database by updating the software. Unfortunately, this process takes a long time because a new app version has to be submitted for App Review by Apple before it has been released. For this reason, we have developed a tool that allows our support team to make necessary changes in your database. To switch on this function, please activate the “Developer” button (in the Options tab). This makes the Correction Assistant icon visible in the "Settings". In this dialog window, you can copy our error-correcting program coding into the input field or execute the statements.
In the menu, you can choose between the following options:
- You can provide us important information (database structure, options/ parameters, individual account titles, backup names, and the error log). No user-specific data is required.
- You can send us your log file. If the Developer mode is switched off, then we only log errors. If the Developer mode is switched on, we will get access to additional information. However, no user-specific data will be transferred.
- You can send us an unencrypted pseudonymized backup of your data. All user-specific data will be replaced by synonyms (ENTRY).
- You can send us an encrypted backup. No data changes will be made.
- You can send us your complete database. No data changes will be made.
- You can turn on the input mode to run our error-correcting program coding.
Before you have send us an e-mail, you can check again what data we will receive from you. Of course, all information provided will be kept confidential, will only be used for the purpose of error analysis and then deleted.
Provided information can help us in identifying why the error has occurred. Based on the result of the analysis, you will either get an error-correcting coding that you can run in the input mode, or we release a software update through the AppStore.
It would help us a lot if you first turn on the Developer mode, close the app in the Task Manager and then restart it. In this way, more information will be logged. As a result, we can better understand the app performance once the app has been launched. Please perform an action several time to make the error happen (if it is possible). We hope that in this way, we will be able to identify the reason for the error in the log file.
Please do not forget to turn off the Developer mode (go to Settings> Options).
3.29 widget
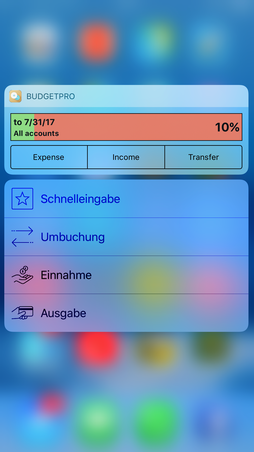
We also support the so-called Today-Widgets, if you have a suitable iPhone. Click at the home screen on the app icon until the widget appears.
You will now be able to recognize your financial margins and directly trigger the app with three different commands (output, input, transfer) to make a booking.
You will be now be able to define in the settings, whether you would prefer the display in percentage or absolute values. You can furthermore deactivate the widget if you would prefer to not have your financial situation displayed.
3.30 iPad-Version
Apart from a few exceptions, the iPad-version is almost identical to the iPhone-version. The major differences are to be found at the navigation bar and at the upper display.
From the iPad-version iOS 9 on, we have included the new multitasking-functions split view and slide over.
Split View is multitasking, like you are accustomed by from the computers. Two apps are displayed on the iPad side by side. These multitasking is only available on the iPad Air 2, iPad mini 4 and iPad Pro with iOS 9 (also see iOS 9 compatibility).
There is a compromise solution for the other devices: Slide Over. Here, the second app is opened in a sidebar. The originally used application will not be exited, but can’t be used at the same time. For a lot of application possibilities this is quite handy.
3.31 Support
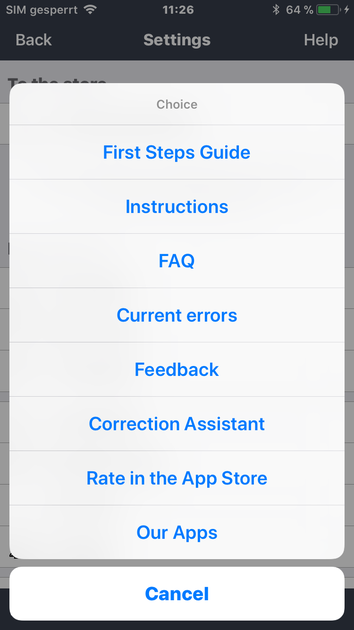
In adjustments there is various information about the app and the team behind OneTwoApps. We suggest to check the following points on a regular basis:
- Future version
- Plan of release
- Current errors
- Frequently asked questions
- Instruction
We would be glad if you take in the app positively, stick with us and write realistic evaluations in the AppStore. The enhancements and maintenance of the app can only be guaranteed, if we can rely on the feedback of our customers. Therefore, we want to ask you to give us a true and constructive evaluation in the AppStore and to advise us right away, if there are problems or questions connected to the app. For this reason we would be happy, if you could report to us if and in what way the update has enhanced the app or solved your problem.
If you have problems with the app and haven’t found a solution yet, please contact us (info@onetwoapps.de).
4 FREQUENTLY ASKED QUESTIONS (FAQ)
Question: Can I transfer data from the app „My Budget Book“ / „My Money 2016/2017“?
Answer: Yes, you can. As both programs are compatible, you can easily import data through the following steps.
- Create a local backup easily and connect the device to your computer.
- Open iTunes and click Apps on the left side (settings).
- On the right side (apps), all shared apps are displayed in shared data.
- After clicking on the app 'My Budget Book', you will see the current backup (*.MHC) in documents.
- Save this file locally on your computer (button 'Save as') or drag & drop the file onto your desktop.
- Click on the app 'My Budget Book Pro Edition' and add this file (button 'add') or drag & drop the backup file.
- Finally, start the new app and import the file under settings/recovery. Done.
Question: I got a new device and do not have the full version anymore. Do I have to pay again?
Answer: When changing devices or reinstalling your present device, “My Budget Book Pro Edition” will be reinstalled as well. However, the app does not operate as full version anymore and it appears as if you have to pay for it again. Certainly this is not the case. The AppStore bookmarks the purchased products and informs you if a product is bought again with the same Apple ID. To convert the app to full version, go to settings and choose the function “restore” under the menu item “in-app purchases”. After the recovery the app should work as full version again. The entire payment transactions are controlled by Apple Inc. We do not have influence on the payment process.
Question: What can be done if the app does not work properly, or if there are regular error messages?
Answer: It is quiet difficult to run an error analysis without having a direct access to the system. For this reason, the app was enhanced with the "Correction Assistant" function.
- To switch on this function, please activate the “Developer” button (in the Options tab). This makes the "Correction Assistant" icon visible in the "Settings". In this dialog window, you can copy our error-correcting program coding into the input field or execute the statements.
- The Menu displays the list of the main commands. For the purpose of analysis, you can send us an e-mail with useful data. Depending on the command, you have an option to attach an unencrypted pseudonymized file, current backup, complete database or error log. The information will be used confidentially for the purposes of analysis and then deleted.
- We highly recommend to backup your files on a regular basis. You can restore a database from a backup file in the event of data loss and do not have to enter your transactions from the very beginning. To let the app automatically back up your data, go to Settings > Options and switch on this feature.
Question: Can I access my account statements from my bank online?
Answer: Unfortunately, this is not possible. However, you have the possibility to import your account statements as CSV files. Two things must be kept in mind for that.
- Your bank must provide you the file. Usually, the CSV file is available in the account statement section of your bank’s internet banking portal.
- Our app must be able to process the CSV file. Unfortunately, the file format is not straightforward. Each bank generates its own CSV file, which our app has to learn and recognize. For this purpose we need your help so that we can gradually support all banks.
Question: How can I import my CSV-data?
Answer: Please thoroughly read the manual chapters 3.15 and 3.16 and import a compatible CSV/Excel file or create your own template to manually migrate the files into your system.
5. Feedback
Do you have any questions concerning the handling? Do you miss a function? Please send us an e-mail. We are pleased about every message, praise, criticism and improvements.
Here you can leave a message. We will always do our best to answer as quickly as possible. Of course we want to invite here all users to discuss with each other or to exchange useful informations!
We would like to feature more languages in the app. If you have interest and time to contribute, we would highly appreciate your translation of our resource file (Excel) and the iTunes description (Word) to any language. Simply leave us a message at support@onetwoapps.com so we can discuss the process. Thank you very much!
As of 02/2018
Version 6.0